在开始之前,我们先回顾下 so 的大概加载流程
do_dlopen -> soinfo::call_constructors() -> call_array -> call_functioncall_array 负责按顺序调用 .init_array 或 .fini_array 中注册的函数指针,这些函数通常是在 .so 加载后初始化时或卸载前需要执行的钩子函数。
也就是说,我们想 hook 住 .init_array 里面的函数就必须在 call_array 执行之前,一般我们会想到 hook android_dlopen_ext 函数,就像下面这样:
Interceptor.attach(Module.getExportByName(null, 'android_dlopen_ext'), {
    onEnter: function (args) {
        this.libname = Memory.readUtf8String(args[0]);
        console.log("[*] dlopen called for:", this.libname);
    },
    onLeave: function (ret) {
        if (!this.libname.includes("libloader.so")) return;
        const module = Process.findModuleByName("libloader.so");

        // 基本信息打印
        // console.log(`[+] Process ID: ${Process.id}, Arch: ${Process.arch}`);
        // console.log(`[+] Pointer size: ${Process.pointerSize}`);
        // console.log("[+] Module base:", module.base);
    }
});
实际运行之后,你会发现根本无法 hook 到 .init_array 里面的函数,其原因是这个时机太晚,.init_array 里面的函数早就执行过了。为了解决这个问题,我们可以尝试去 hook call_constructors 函数
do_dlopen()
  ├─ mmap 加载 .so 到内存
  ├─ 创建 soinfo 实例
  ├─ 加载依赖库(递归 DT_NEEDED)
  ├─ 解析符号 & 重定位(relocations)
  ├─ 此时 so 已成功加载到内存(可以访问代码和数据段)
  └─ call_constructors()  ← 仅此时开始运行构造器逻辑
整个加载过程都是由 Android 系统内部的 linker 进程来完成,linker 是 Android 系统用来加载和链接 .so 动态库的核心组件。
我用的是 Android 9 arm64 系统,所以 linker 程序所在的位置是 /system/bin/linker64 ,我们把它从手机里面拿出来用 IDA64 分析一下,在函数窗口处搜索 call_constructors
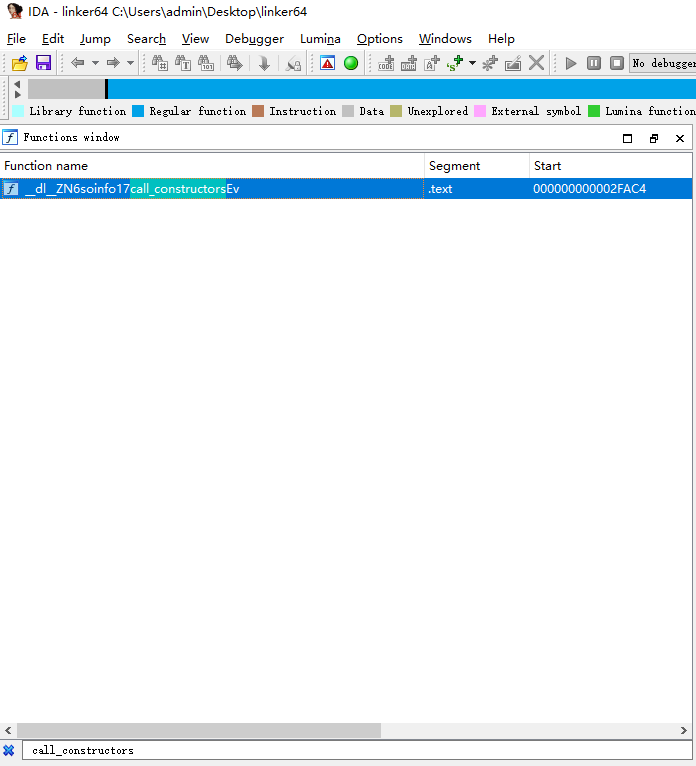
可以看到它的偏移是 0X2FAC4,有了偏移就好办了,我们直接写一段 Frida hook 代码
// Android 9.0 64-bit linker64 call_constructors .text	000000000002FAC4
// so大概加载流程 do_dlopen -> soinfo::call_constructors() -> call_array -> call_function
// call_constructors 这是个非常好的时机 在 call_array(.init_array) 之前
Interceptor.attach(Process.getModuleByName("linker64").base.add(0x2FAC4), {
    onEnter(args) {
        var soinfo = this.context.x0;
        var nameFlag = Memory.readU8(soinfo.add(416)); //十进制偏移
        var namePtr;

        if ((nameFlag & 1) != 0) {
            namePtr = Memory.readPointer(soinfo.add(432));
        } else {
            namePtr = soinfo.add(417);
        }

        var nameStr = Memory.readUtf8String(namePtr);
        if (nameStr.indexOf("libloader.so") !== -1) {
            var moduleBase = Memory.readPointer(soinfo.add(16));
            console.log("[*]call_constructors Module base address: " + moduleBase);
            console.log("[*]call_constructors libloader.so constructors running");

            //尝试hook .init_array 里面的函数
            Interceptor.attach(moduleBase.add(0x571C8), {
                onEnter: function (args) {
                    console.log("[*] 0x571C8 called");
                },
                onLeave: function (retval) {
                    console.log("[*] sub_0x571C8 returned ");
                }
            });
        }
    }
});
运行之后你会发现成功 hook 住了 .init_array 里面的函数,你可能会想问,call_constructors 函数的一些偏移都是怎么找出来的?关于这些偏移信息是怎么找的,请参考 Android linker 源码以及 IDA64 解析出来的 C 伪代码,再配合上 ChatGPT 你就会懂了。
linker 源码地址:
https://cs.android.com/android/platform/superproject/main/+/main:bionic/linker/linker_soinfo.cpp
最后,再附上一个 hook call_array 的 Frida 代码,可以打印出 so 的所有 .init_arrray 里面储存的函数
function hook_call_array(soName) {
    // Android 9.0 64-bit linker64 call_array .text	000000000002F734
    // void call_array(const char* array_name __unused, F* functions, size_t count,bool reverse, const char* realpath)
    Interceptor.attach(Process.getModuleByName("linker64").base.add(0x2F734), {
        onEnter(args) {
            const arrayName = args[0].readCString();
            const funcs = args[1];
            const count = args[2].toInt32();
            const realpath = args[3].readCString();

            // 取当前 so 的 base 地址
            const module = Process.findModuleByAddress(ptr(funcs));
            if (!module || !module.name.includes(soName)) {
                return;
            }

            console.log(`\n=== call_array(${arrayName}) ===`);
            console.log(`path: ${realpath}`);
            console.log(`count: ${count}`);
            console.log(`functions ptr: ${funcs}\n`);

            const base = module.base;
            console.log(`[${module.name}] base: ${base}\n构造函数列表:`);

            for (let i = 0; i < count; i++) {
                const funcPtr = funcs.add(i * Process.pointerSize).readPointer();
                const offset = funcPtr.sub(base);
                console.log(` [${i}] => ${funcPtr}  (offset: ${offset})`);
            }

            console.log("=== end ===\n");
        }
    });
}